Sign Up
In order to sign up to Vsurve application, click on Free Trial option on the home page.
The sign up page appears to fill details required for sign up. Enter first name, last name, phone number, email address and password then click SUBMIT. A valid password should be at least six characters long, having at least one lowercase, one uppercase, one special character and one digit.
NOTE - For password following the below rules
- At least six characters long
- At least one lowercase character (a-z)
- At least one uppercase character (A-Z)
- At least one digit (0-9)
- At least one symbol (? . , ! _ - ~ $ % + =)
You will get an email verification code to your entered email address. Enter that verification code in Vsurve application to the verify the email.
Once the email verification is done, you will be redirected to login page along with the email verification success message. Enter the email and password and click LOGIN to login to the application. You will be navigated to the company and admin details page.
In company details you can enter company name, website address, workspace name. Select NAICS and SIC values. You can select multiple values. In admin details you can enter base working hours, no. of holidays, weekly working days and select TimeZone. Click on the symbol to get more details about the fields. Finally, submit the data.
On successful signup along with your company details, you will be redirected to the Dashboard for your workspace. Highlighted icon shows the workspace name.
Login
You can login to the application by clicking on LOGIN option on top right side of the home page. Once you click on LOGIN option, login page appears. Enter email address and password, then click on LOGIN button.
You will be redirected to the Dashboard.
Forgot Password
In case you forgot your password, click on the Forgot Password? Option on the login page. Forgot password screen appears. Enter the registered email address and then submit the data.
You will receive an email with verification code. Enter the verification code along with new password and confirm it on the reset password screen.
After submitting data the page will redirect to login page. Then you can login with the new password set recently.
Dashboard
The VSURVE Dashboard is the first screen you see when you log in to VSURVE. It can be configured to display many different types of information, depending on your areas of interest.
If you are anywhere else in VSURVE, you can access your VSURVE Dashboards view by clicking VSURVE LOGO at the top left your screen or Home Icon () in the left menu panel.
The information boxes on the dashboard are called Widgets:

| Widget | Description |
|---|---|
| Ticket On Performance | Click on the first small tile with the name ‘Ticket On Performance’. It shows details of all tickets which are ‘on performance’ i.e. where the current date lies between the planned start date and planned end date of the tickets. Click on () to get back to ‘Dashboard’. |
| Ticket Running Late | click on 'Ticket Running Late' tile. The screen appears with all the overdue tickets details. To go back to the ‘Dashboard’ screen, click on ( ) icon present above the top right corner. |
| User Active | Click on ‘User Active’ tile. The ‘User Management’ screen appears. You can view the users list with active user count. You can search for particular user using the search box provided. |
| Tickets | On the right side, on “Tickets” section gives you the ticket counts based on ticket status in the form of donut chart. You can select any project from the dropdown given above the donut chart. |
| Project Progress | Scroll down the screen, you can see 2 panels Project Progress and Under Utilized Resources. Click on the project name from the ‘Project Progress’ panel. The project details appear in the screen. Click on ‘back’ button to go back to ‘Dashboard’ screen. |
| Assign Ticket | Click on ‘Assign Ticket’ from ‘Under Utilized Resources’ panel. Select ‘New Ticket’ from the dropdown. The ‘Add Ticket’ screen is displayed. Provide all the details and click on ‘Create Ticket’ button. This part is explained in detail in the ‘Tickets’ section. |
| Tickets |
Scroll down the screen, you can see the “Tickets” table. The screen contains 3 tabs Todays, Upcoming, Overdue
Click on three dots () on right corner and select ‘My Tickets’ You can view your Tickets list. |
Project
You can create a new project only if you are given permission by an Account Admin.
Projects are how you organize and plan all of the tasks related to a specific initiative, goal, or big piece of work. An example of a project might be in releasing a new feature for your software product. It requires you to have sufficient control over your value stream, ensure proper resource management, and involves individual steps such as research, requirements gathering, scope identification, the definition of goals, and deadlines for your project.
Create a new project
-
Click Add Project from the Menu on left panel. Project screen dialog box will appear. Enter a project name and the related project description and select any one of the three available priorities – High, Medium, Low.
- Click on the ‘Date’ tab we can set Planned dates and Actual dates for the project. You can also navigate to the tooltip to read the description of each field.
- Click on the ‘Members Tab’. A list of members is generated from where multiple users can be selected/assigned for the project.
- Select an additional field in ‘Additional Tab’, where a custom field when selected can be added any value as per user choice. Finally click on ‘Create Project’ button.
View Project List
To view all the created projects, navigagte to the “All Project” on the left menu panel. You can see the project created successfully in the lists
Custom Search - You can search for particular project using the search toggle button provided top right side. If you click on the search button, you have the option to filter projects based on the fields Project, Owner, Status, Priority, Planned Start Date and Planned Due Date. After selecting values for the fields, click on “Search” button given just after the fields. The data in the table gets filtered accordingly.


View/Edit, Archiving and Deleting a project
When you create a project, you become the Flow Admin and have the ability to change many settings. To perform any Action on the created projects, simply click on three dots ( ) under the action column listing the options – View/Edit the project, Delete the project and Archive the project.
-
View/Edit - If you click on View/Edit, all the project details are shown and it can be edited here. Click on pencil icon () to edit project field values and then click on right mark () to save the value. In the panel Team, you can either add a new member or remove an existing one.
Time span panel shows the amount of time spent on the project with respect to planned days.
In “Tickets panel” below the “Time Span”, you can view number ticket based on status from the current Project.
-
Archive - Click on Archive under Actions icon () to archive the project. After archiving, all its items will no longer be visible. However, project can be retained.
Please close all the tickets under the project before Archiving
To unarchive a project, click on Archived Projects from left menu to see the list of archived projects. You can unarchive a project by clicking on Unarchive.
- Delete - Under Actions icon (), click on Delete option to delete a project.Click on ‘Delete’ button to confirm else ‘Cancel’ the deletion.
Ticket
Tickets are unique because they provide a visual board through which case participants can work collaboratively and resolve items. You can also customize the possible resolutions at every step.
Create new Ticket
Click on the "ADD Ticket" from the left menu. “Add Ticket” screen appears. It contains 6 tabs Details, Date, Assignees, Upload, Additional Fields and Activity.
You can also click on the Add Ticket button or Plus Icon on the top right above the tickets table list.
- Details: In Details tab provide the Ticket name in Ticket title. Select the Project name from the dropdown. Select the Priority, Category, Status from the dropdown and provide the ticket description and environment name in the respective space.
- Date: Navigate to Date tab and enter the Planned Start Date, Planned Due Date, Actual Date and Actual End Date. Click on the () symbol to get more details about the fields.
- Assignees: Navigate to Assignees tab and select the Primary, Secondary, Tertiary, Auxiliary Assignee and RASCI from the dropdown.
- Upload: Navigate to Upload tab, upload the required documents for the related to the project or task here.
- Additional Fields: In Additional Fields tab select the additional fields from the dropdown. You can select multiple additional fields.
- Activities: Activities are sub tasks of the ticket. Give all activities of the ticket.
- Create and Add another: You can create multiple ticket without closing the window
View Ticket
To view all the created Tickets, navigagte to the “All Tickets” on the left menu panel. You can see the list of tickets created successfully.
Custom Search - You can search for particular ticket using the search toggle button provided top right side. If you click on the search button, you can select required tickets from the dropdown and click on “Search” button given just after the fields. The data in the table gets filtered accordingly.

Add Activity
Click on ‘Add Activity’ from the left-menu. The screen pops up for adding the activity for perticular project and tciket. Select the Project and Ticket from dropdown and enter the activity under ‘Activity Name’. You can add multiple Activity name by clicking on the plus icon (). Finally click on ‘Add’ button.
View/Edit, Close Ticket, Add Activity and Delete
To perform any Action on the created Tickets, simply click on three dots () under the action column listing the options – View/Edit, Close Ticket, Add Activity, Delete.

-
View/Edit - You can view your Ticket details and can also edit it. Click on the pencil symbol () to edit any fields. Select the required ‘Priority’ from the dropdown and click on ‘Submit’ icon. Do the same for other fields.
Scroll down the screen, You can also add/delete Activity, Files, Additional Fields, Primary, Secondary, Tertiary and Auxiliary Assignees.
Time span panel shows the amount of time spent on the ticket with respect to planned days.

- Add Activity - Click on the three dots () at the right corner under ‘Action’ column. Click on ‘Add Activity’. The screen pops up for ‘Add Activity’. You can enter the activity under ‘Activity Name’ and click on ‘Add’ button.
- Close Ticket - Click on the three dots () at the right corner under ‘Action’. Click on ‘Close Ticket’. ‘Alert’ screen pops up. Click on ‘Close Ticket’ button. You can see the Ticket as being closed successfully under ‘Status’ column.
- Delete - Click on the three dots () at the right corner under ‘Action’ column. Click on ‘Delete’. The ticket gets deleted from the list.

Time Entry
Time Entry is the process of recording the actual time that a resource consumes. These entries help the project manager keep on top of projects and tasks.
Add New Time Entry:
Navigate to the “Time Entry” from the left main menu and select “Add New Time Entry” to make new time entry. The time entry screen appears.

- Select a Project from the dropdown for which you want to add the time entry.
- Select a Ticket from the dropdown. You can also create a new ticket if you need by selecting “ Add new ticket” option just below.
- Select an Activity from the dropdown. You can also add new Activity if you need selecting “ Add New Activity” option just below.
- Write description of the time entry.
- Select Date, Start Time and End Time, you can also hover on the symbol () to get more details about the fields and then click on “Submit”.
New time entry will be created.
View All Time Entry:
Navigate to the “Time Entry” from the left main menu and select “All Time Entry” to view all time entries made.
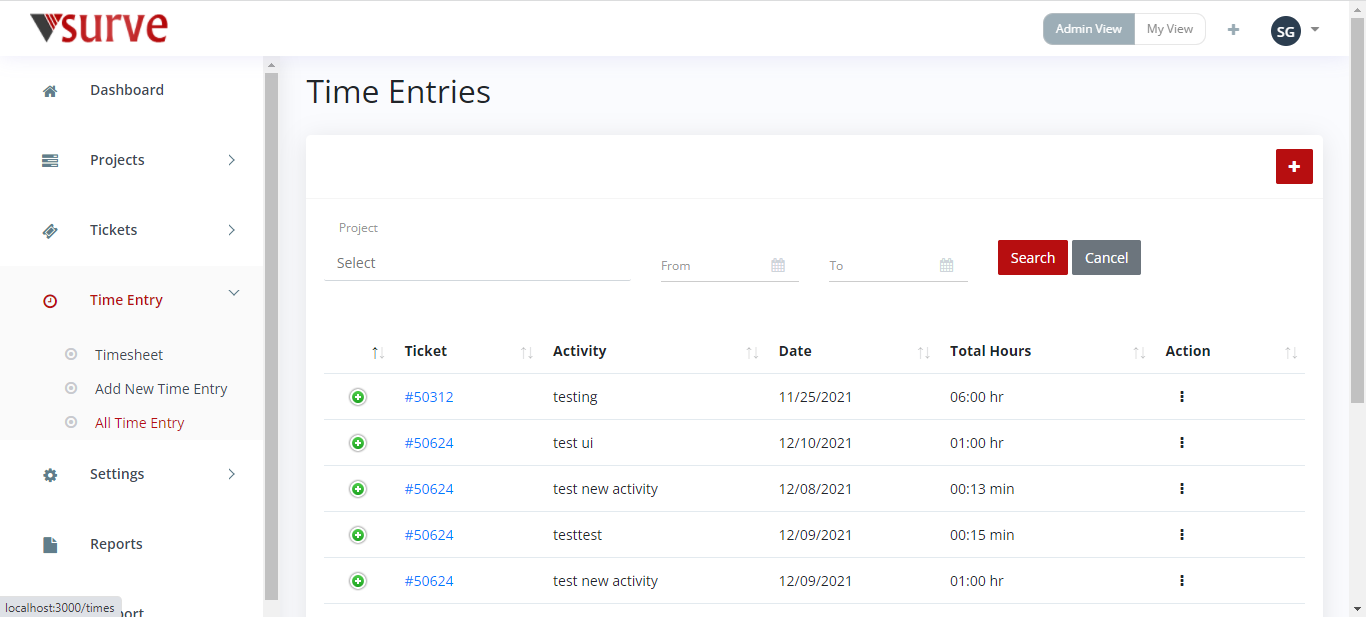
- You can filter the data by Project and date range. Click on “Cancel” to remove filter values.
- You can also create a new time entry using the symbol on right top corner.
-
Click on () symbol of any of the tickets, the details of that time entry will be shown.
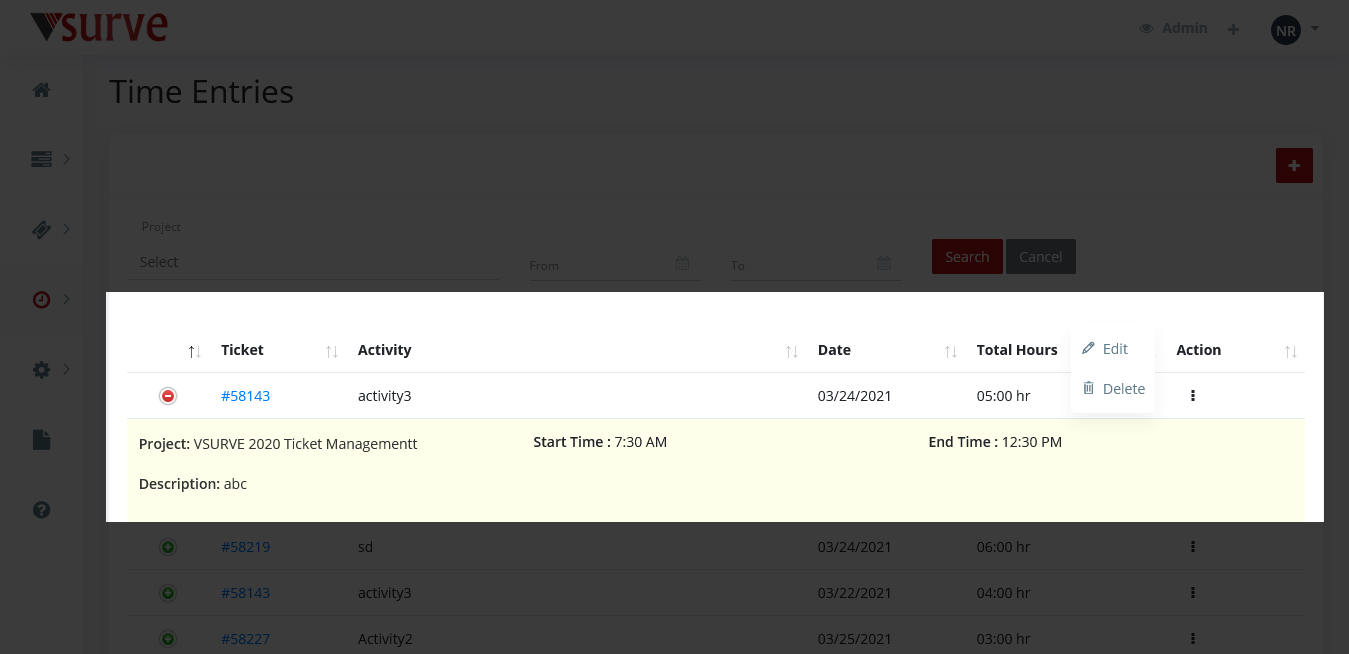
- Click on Action symbol () to update it or to delete it.
TimeSheet
Navigate to the “Time Entry” from the left main menu and select “Timesheet” to view the timesheet.
- View Time Entries: You have 2 options to view the timesheet data. One is by Day and another is by Week. Left and right arrows are there to move forward or backward bot for Day and Week. Also, you can use “Calendar” option to select any particular date.
-
Add Time Entry in Timesheet: You can click on symbol given just below the time entries to create new time entry. The screen appears to enter details. If you have selected “Day” then it asks for single day entry and if you have selected “Week” then it asks for a week time entry detail. Enter all details and click on “Submit” button.
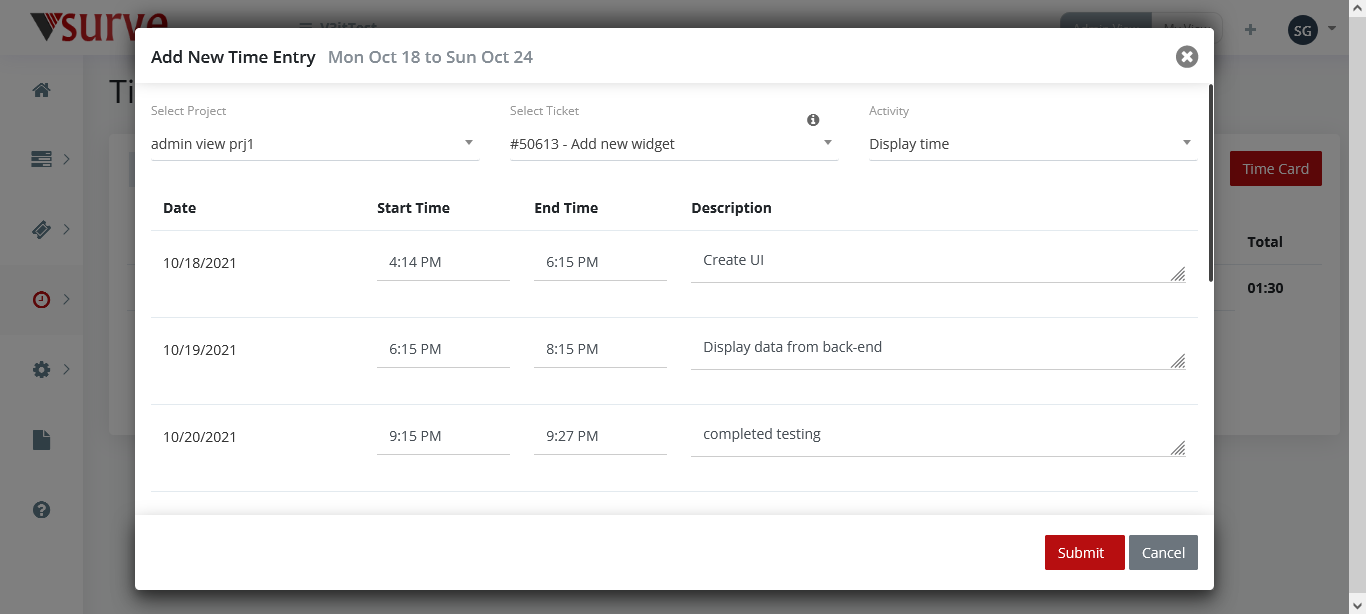
- Edit Time Entry: You can also click on any time on the Timesheet and if the entry is already made for that time, then it opens up the edit time entry screen to enter description and time range. Enter the details and click “Submit” button.
-
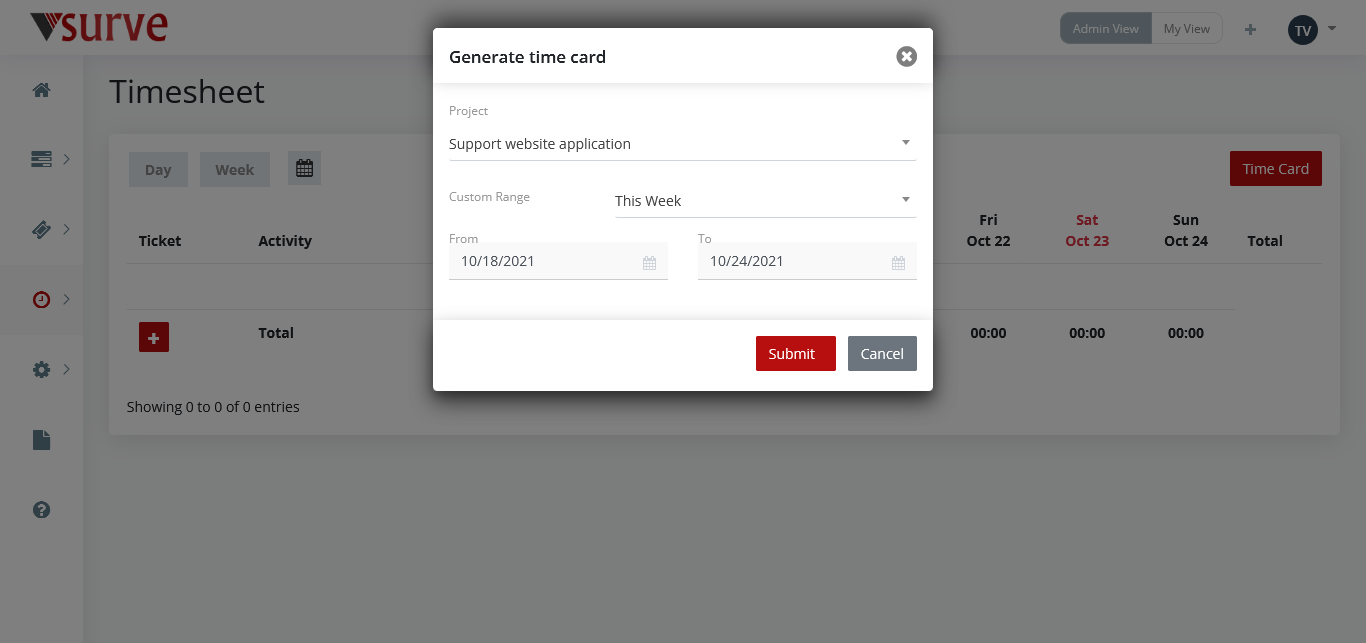
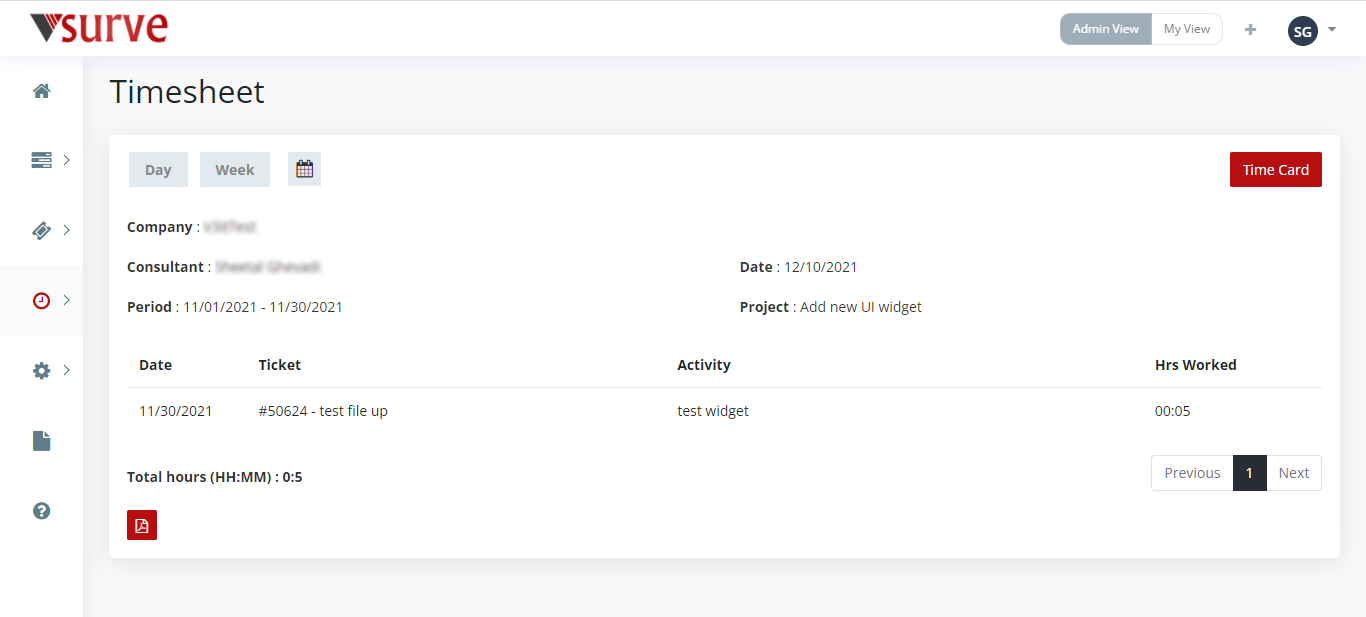
Time Card: On the top right corner click "Time Card" button, a modal popup appears then select the desired project of which you want to check the time entries between date range and click on “Submit”.
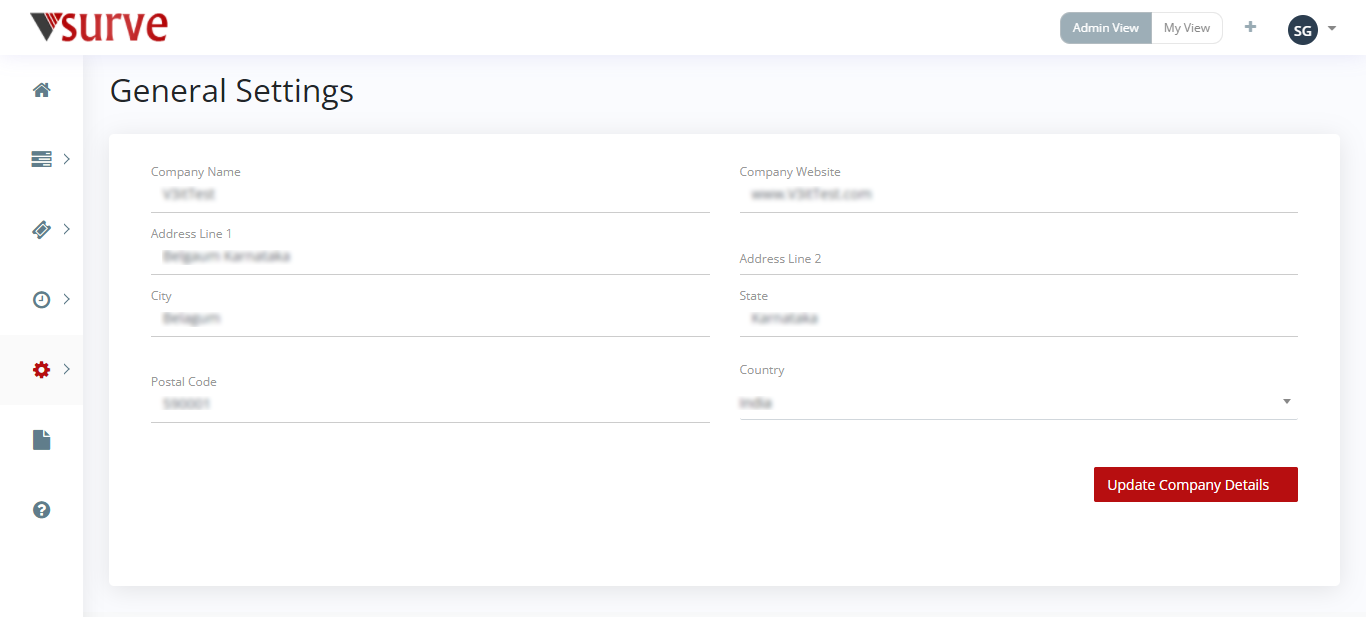
General Settings
From the left-menu, within Settings icon (), select General settings which has primarily Company Name and Company Website. Other details includes Address, City, Country.
You can edit field values and click on Update Company Details button to update details.
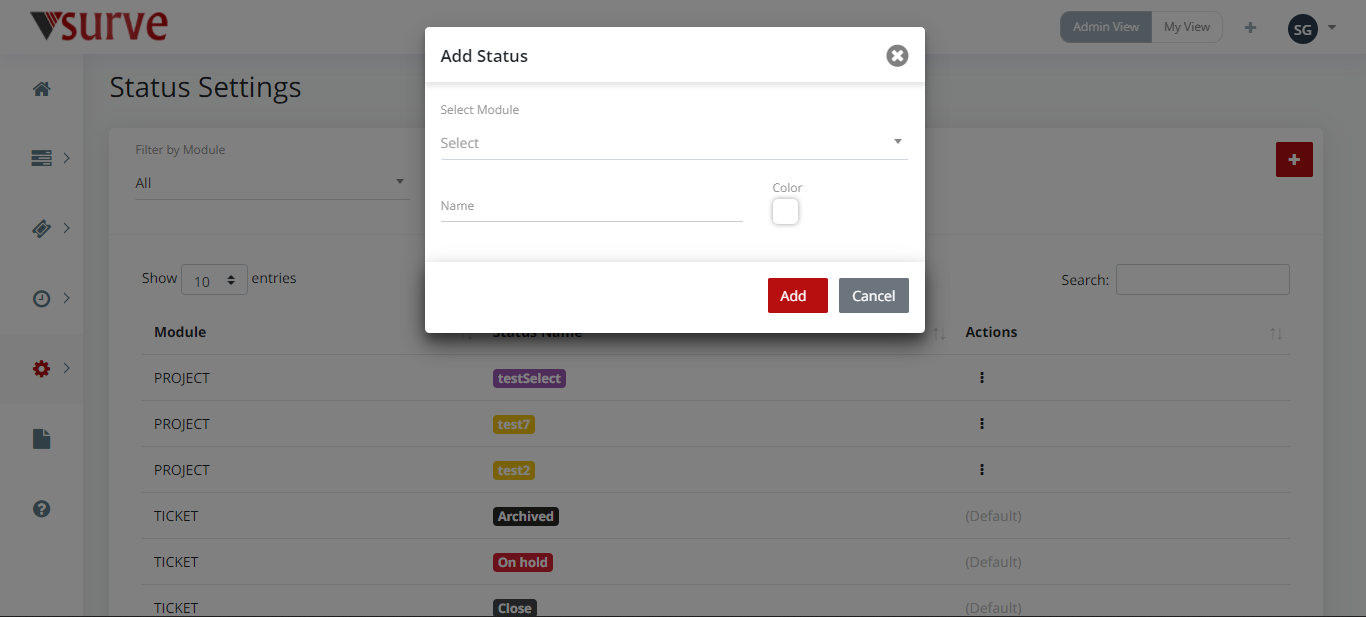
Status
Select status from the left menu panel, Status Setting dashboard is displayed.
Click on the Symbol in top right Corner to add the status. A Dialog box appears where you can select module either Project or Ticket and enter the desired status Name.

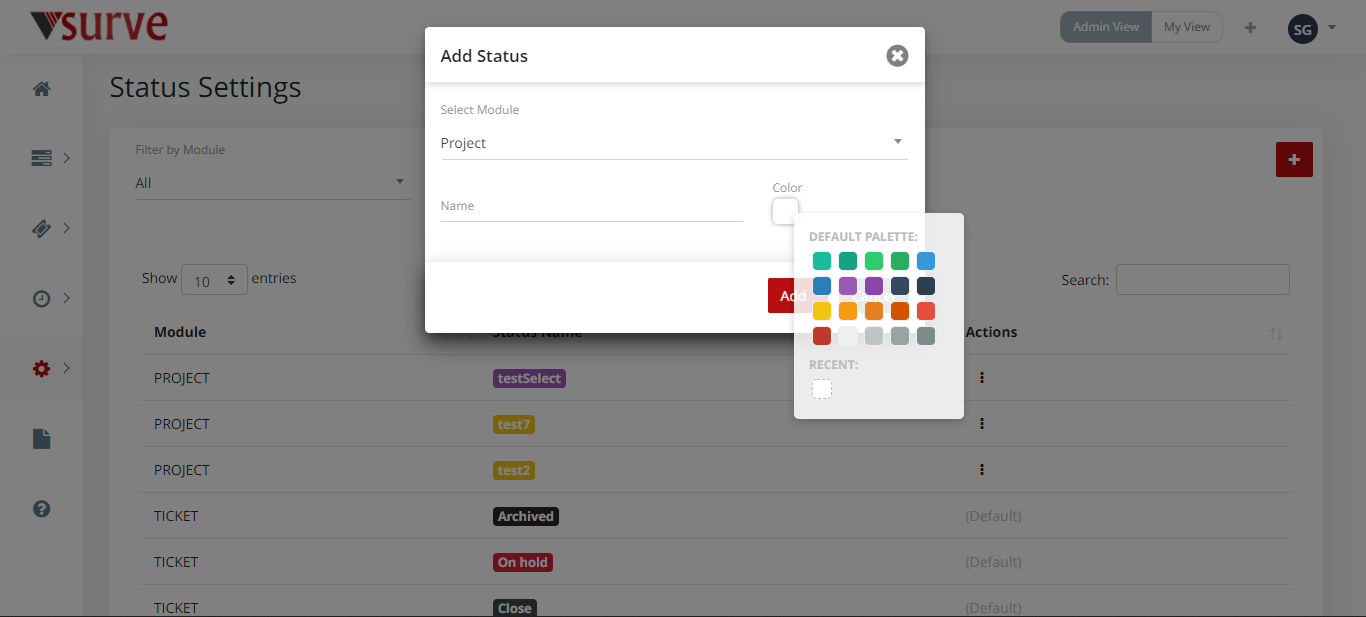
You can also add the custom color to the status accordingly. To select the color click on the Color picker panel and select the Color from the default palette.
To Edit/Delete the status navigate the () Symbol to perform perticular action ont the status and choose the action from dropdown
You can filter statuses by modules. Select a module from top left search bar then table data is filtered according to the module selected.
Custom Field
There are pre-defined fields for project and ticket like name, id, status etc. but if in case you need any extra information to be strored for project/ticket then you can create a new custom field. You can create custom field either for module “Project” or “Ticket”. When you select “Custom Fields” from the Settings menu, you see the list of all custom fields along with their modules.
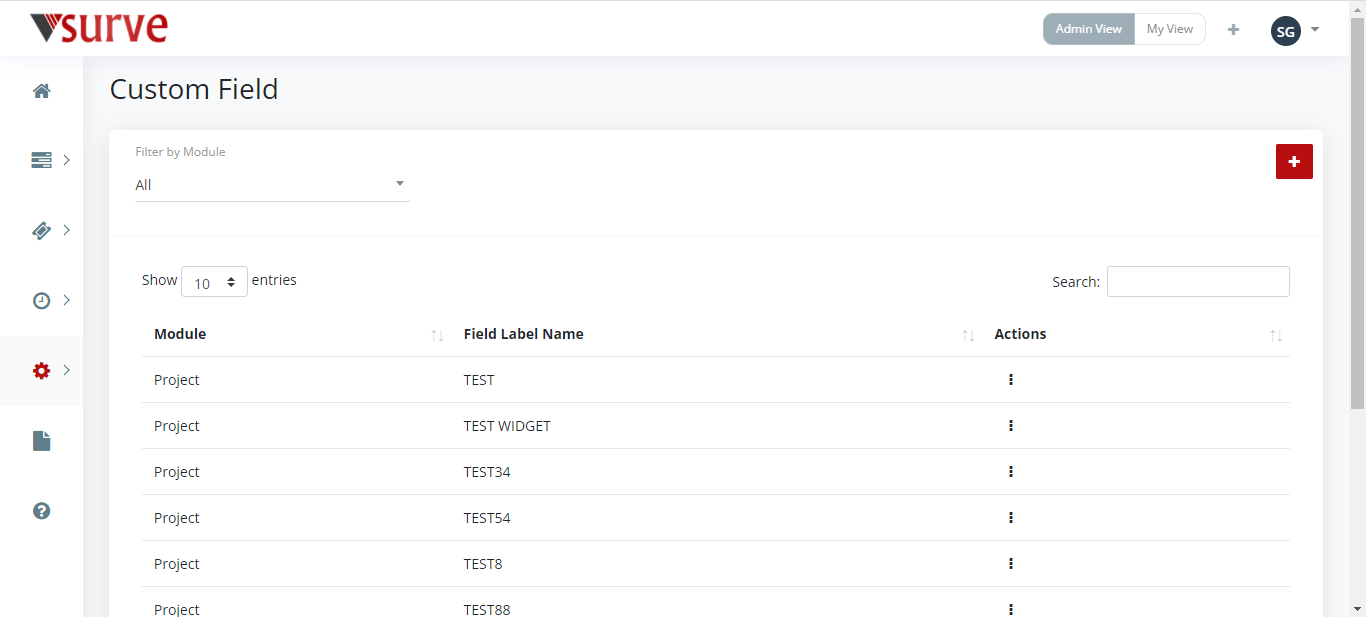
You can add a custom field using the symbol given at the right top corner. You need to give the name of custom field and module for which you want to create the custom field.
You can edit the custom field name using “Edit” option under Action, however module can’t be changed.
You can delete any custom field using “Delete” option under Action.
You can filter out custom fields based on modules Project and Ticket using the dropdown given above the list.
Roles & Permissions
Roles and persimissions are important to provide privacy to the information. Under roles and permissions, you will have option to add new roles and update existing ones.
When you select Roles & Permissions, the list of roles will appear along with their descriptions.
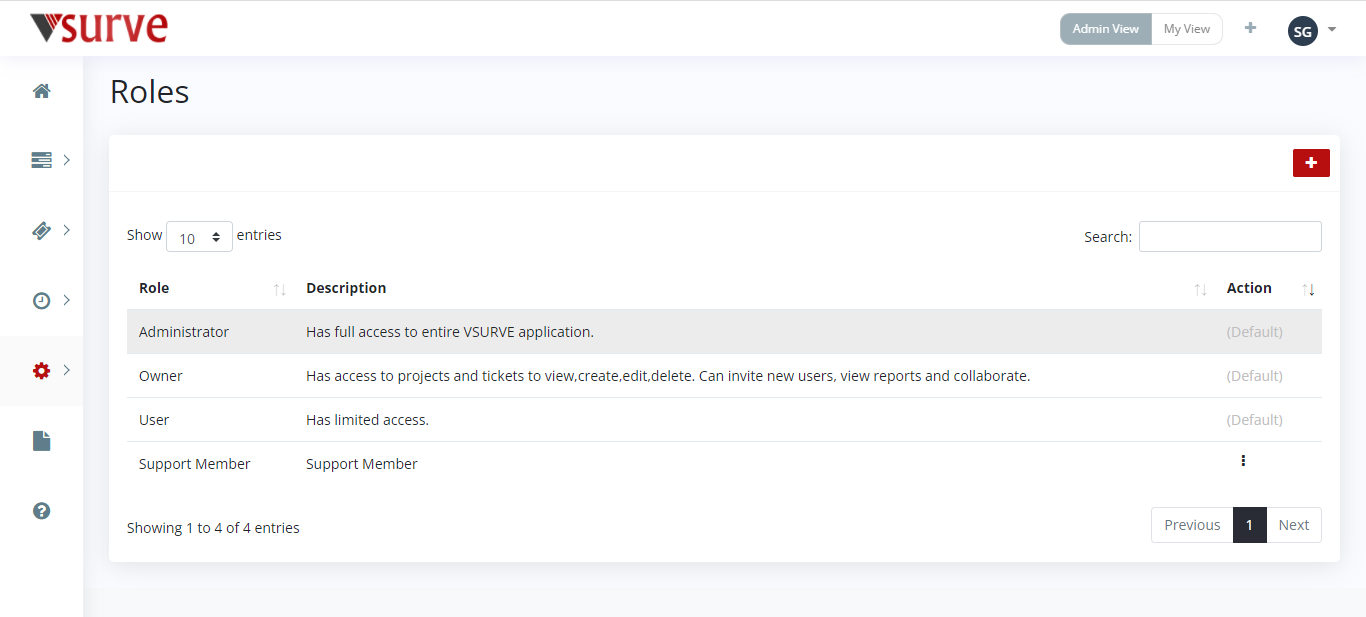
You can add new role using the button “Add Role”. When you click it, you have to give role name, description and all required permissions.
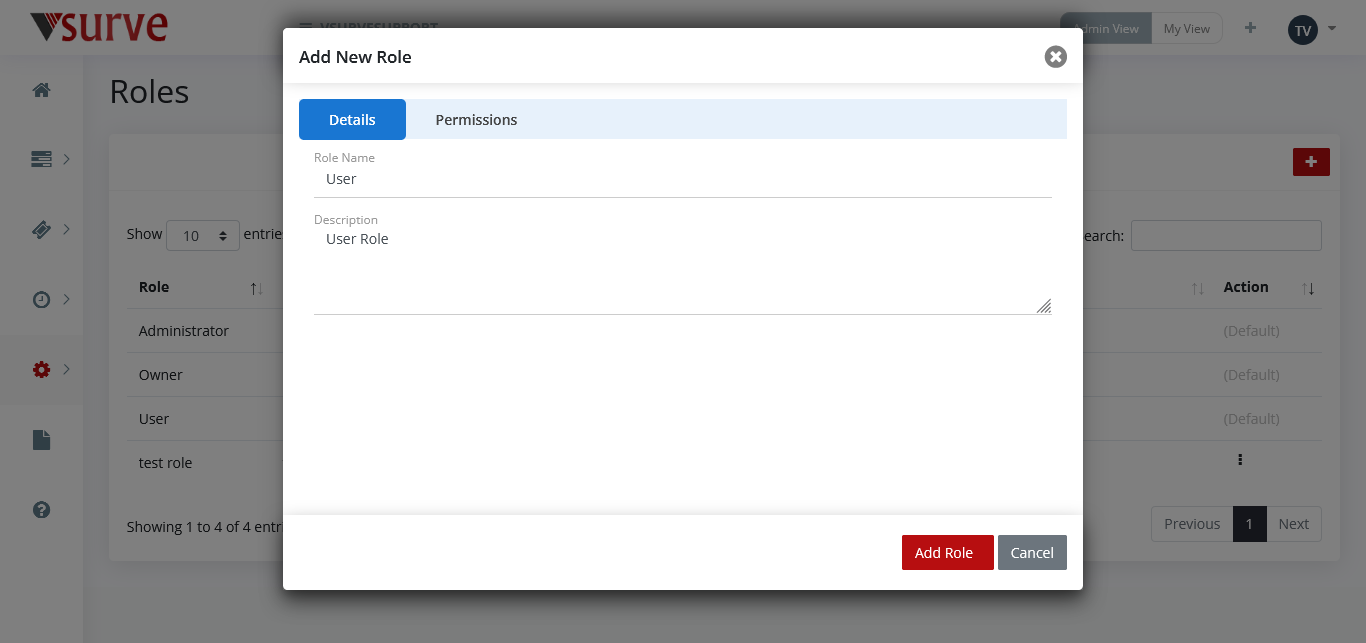
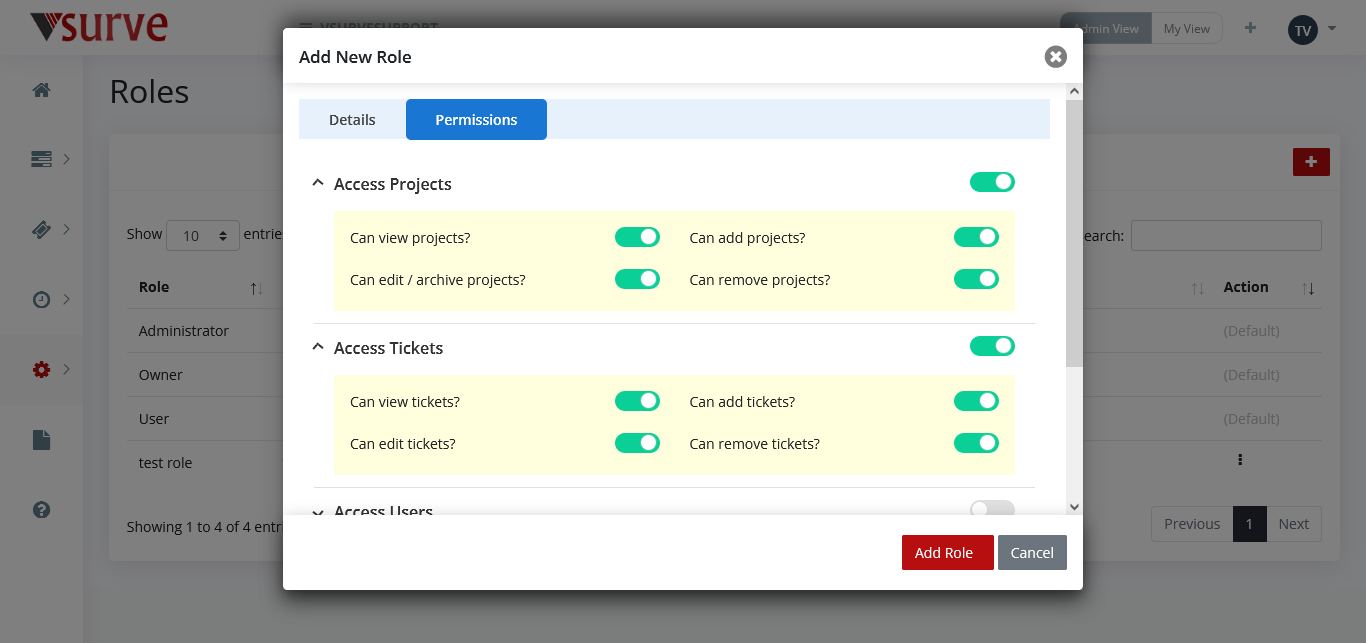
You can edit the role using edit option under Action.
Role can also be deleted using the “Delete” option under Action.
User Management
Here you have options to add users, update and deactivate the users. When you select user management from settings, you will see the list of users.
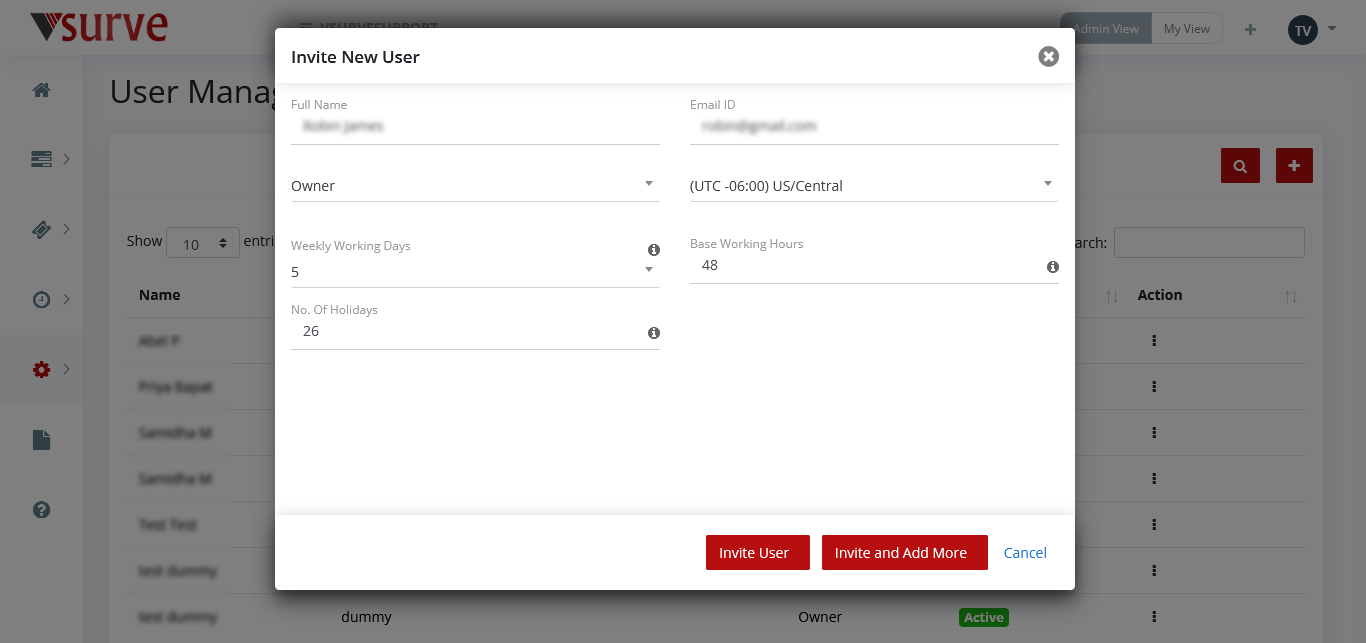
You can add new user by clicking on “Add User” button. Fill all required information as shown below and click “Invite User” button. User can be seen in the list after successful invitation.
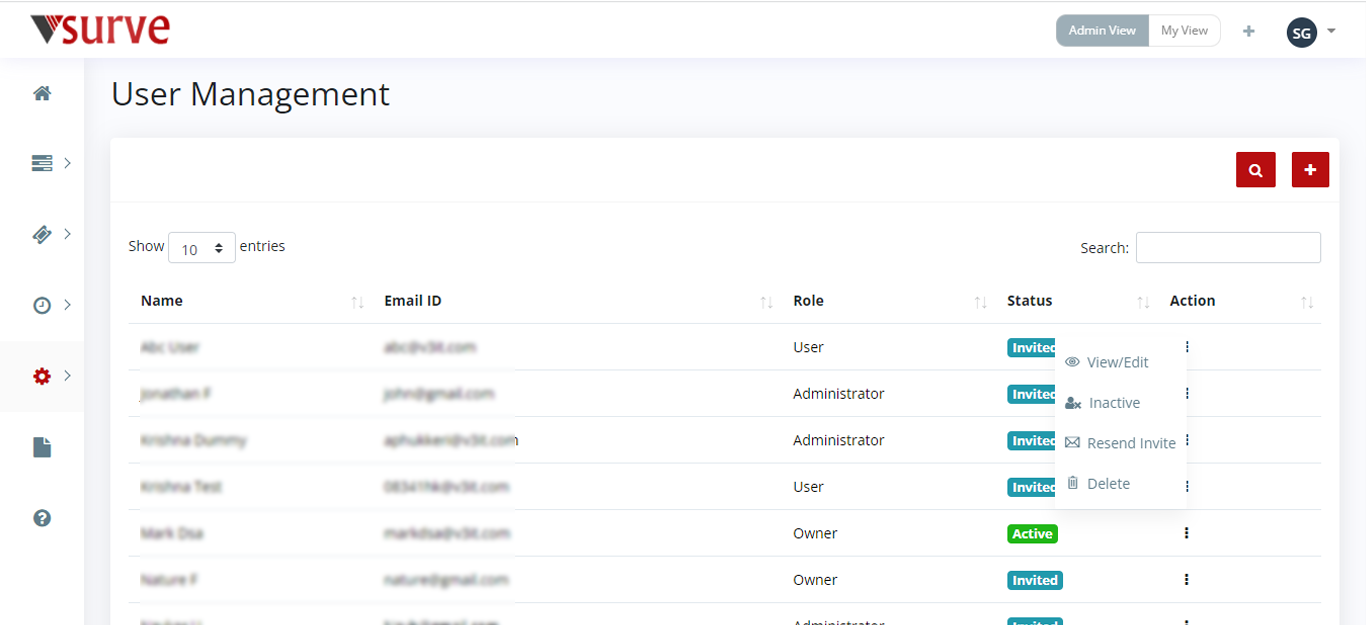
You can edit the user using “Edit” option under Action icon and update.
Invitation can be resent using “Resend Invite” option under Action icon.
User can be deactivated using the “Inactive” option under Action icon.
Report
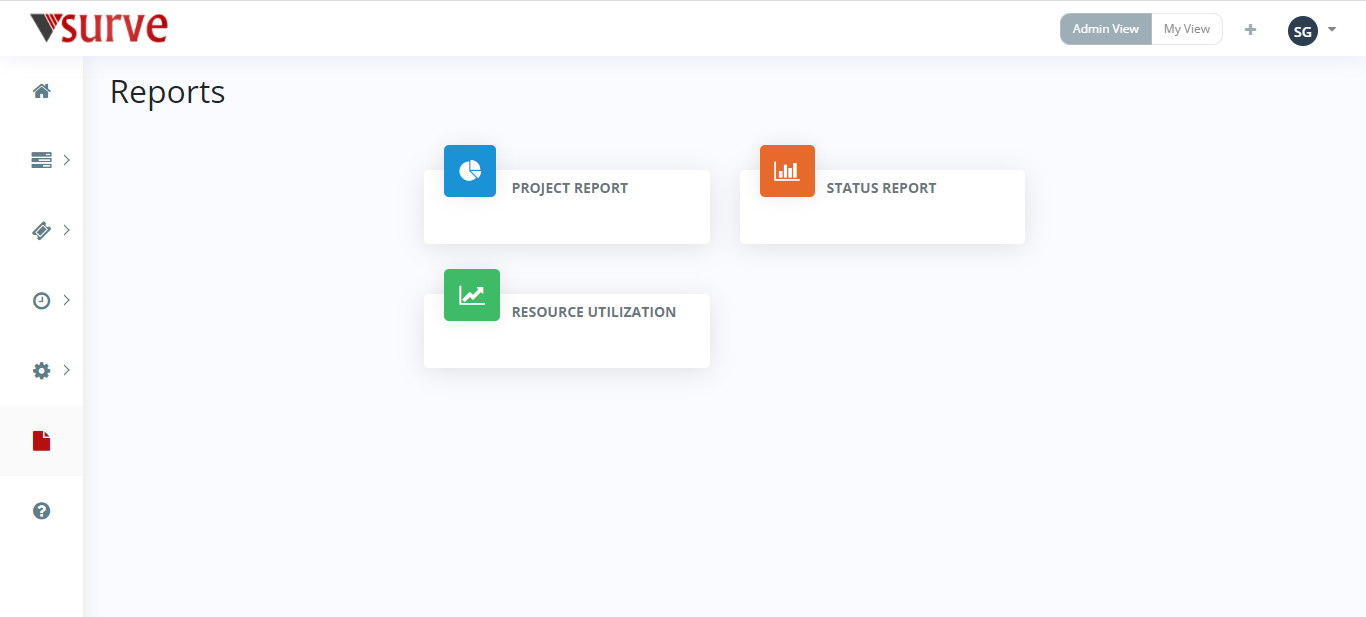
When you select Report menu from the main left menu, you will be redirected to “Reports” page and you can see all reports there. Click on the report you want to see.
Project Report
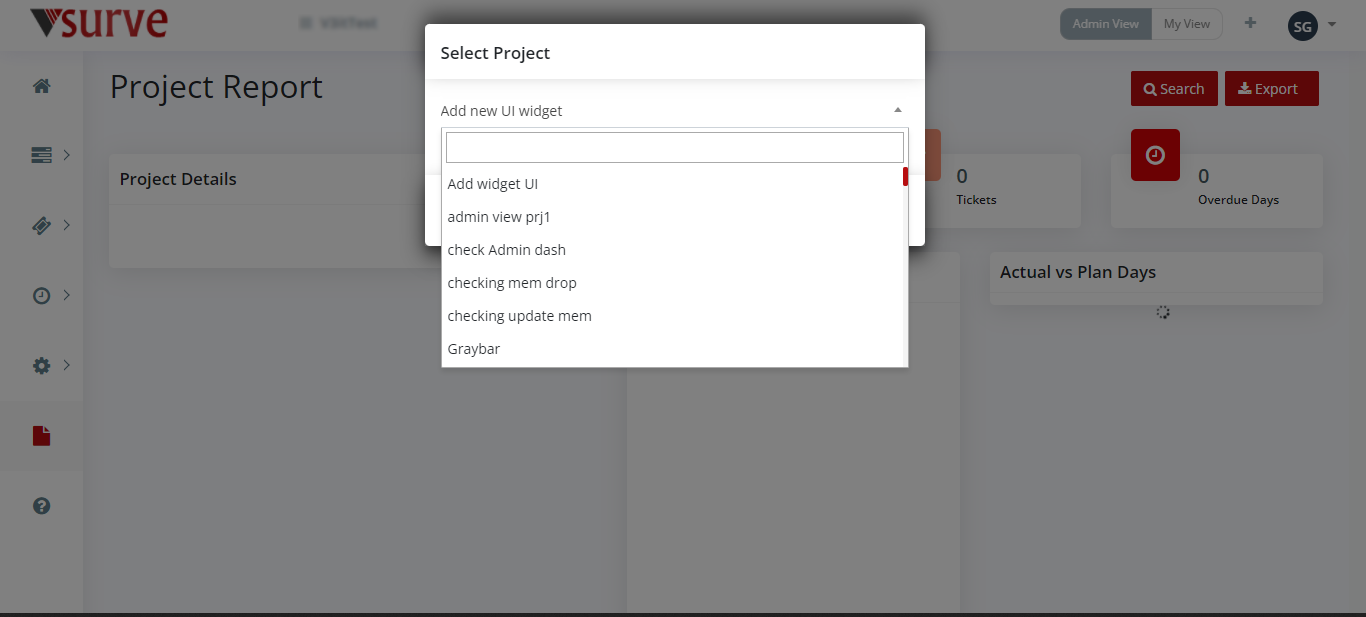
Project report gives you details about one particular project at a time. When you click on project report, initially you are asked to select the project from the dropdown then it will open up the report.
-
Here you have a toggle search button on the top right side to filter the data further. Here you can choose the Project, Ticket Owner, and Ticket Status.
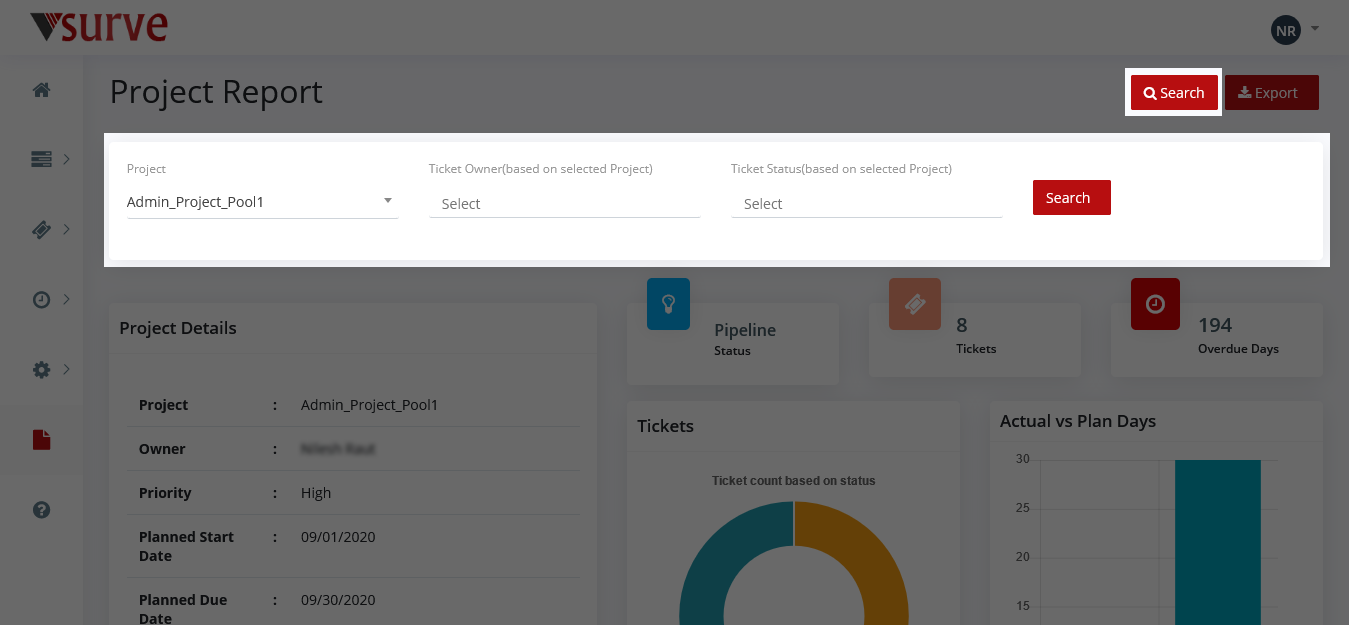
- You can filter out the table data based on Ticket Status using donut chart just by clicking on particular Ticket Status.
- There is a search box just above the table to filter data based on ticket name, ticket id, ticket status etc.
- You can export the table data using the export option given at top right corner. Click on export button, select columns you want to be in exported file, then click on export button. File will be downloaded.
Resource Utilization Report
Resource utilization report gives the details about individual time utilization and tasks working on. When you click on the report, a prompt appears that will have 2 options to choose, Search by resource and Search by project. You can choose anyone. Resource, Utilization from and Utilization To are mandatory fields.
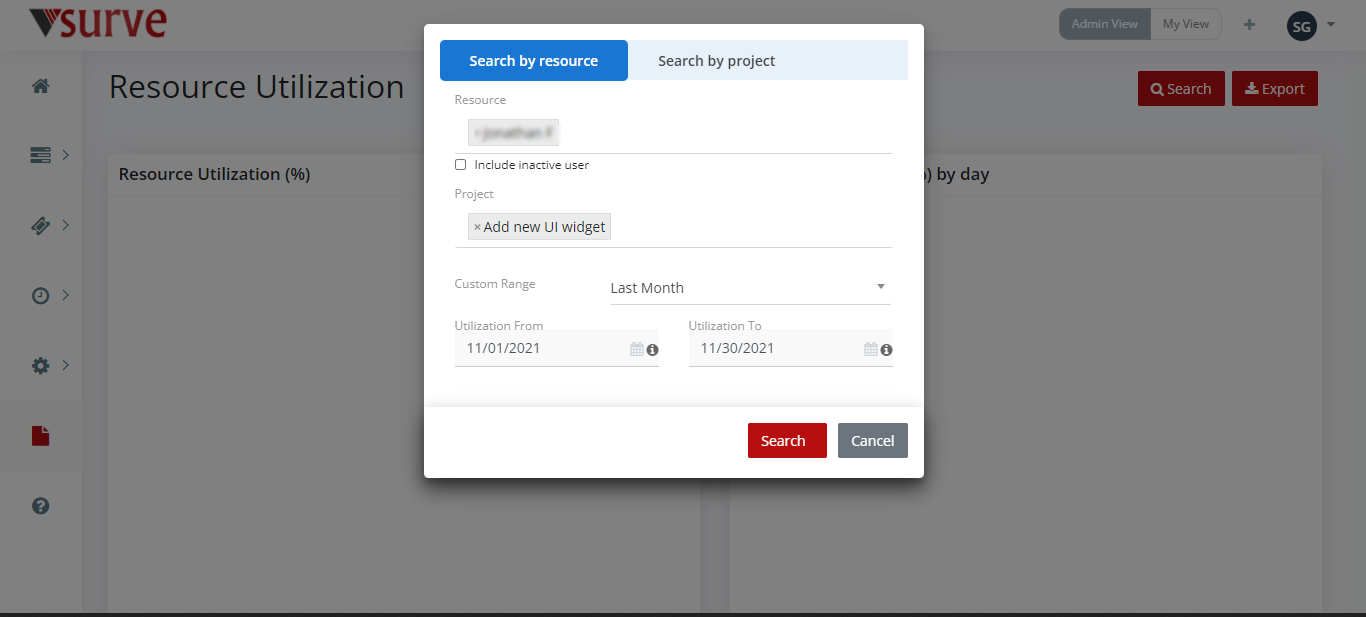
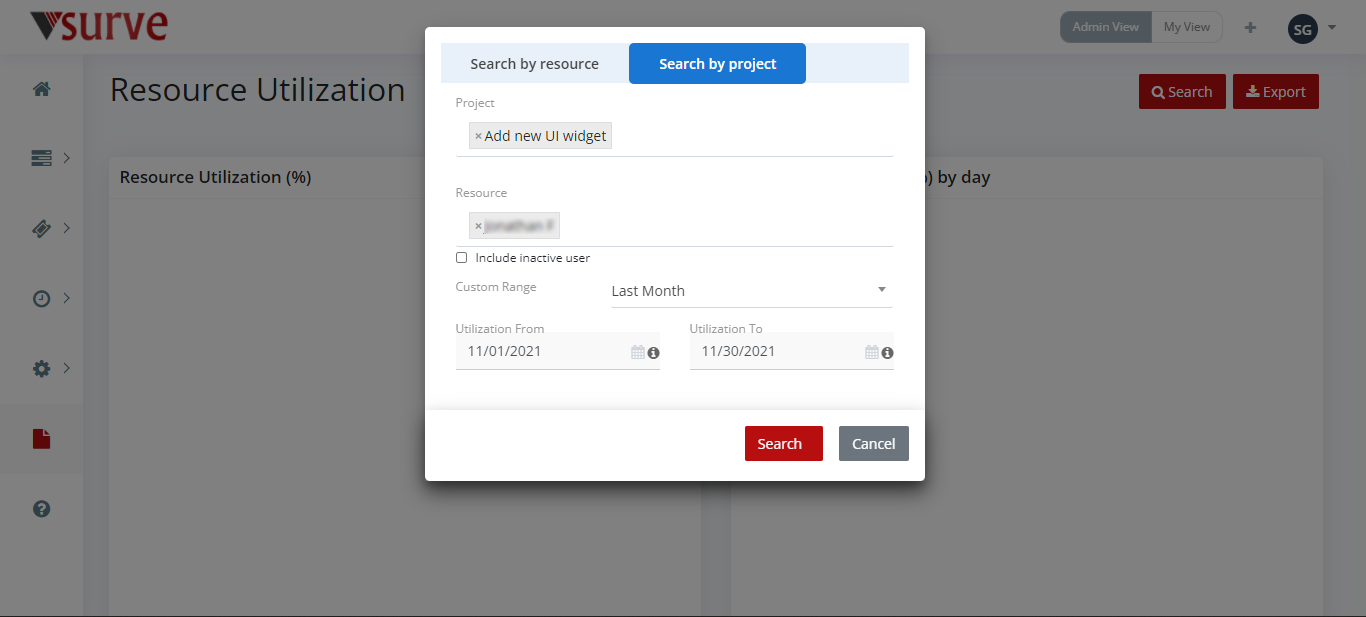
- In Search by project, choose Project, Resource, Utilization from and Utilization To then click on Search button. Resources are loaded based on selected projects.
- In Search by resources, you will be selecting resources.
The report opens up for your given input.
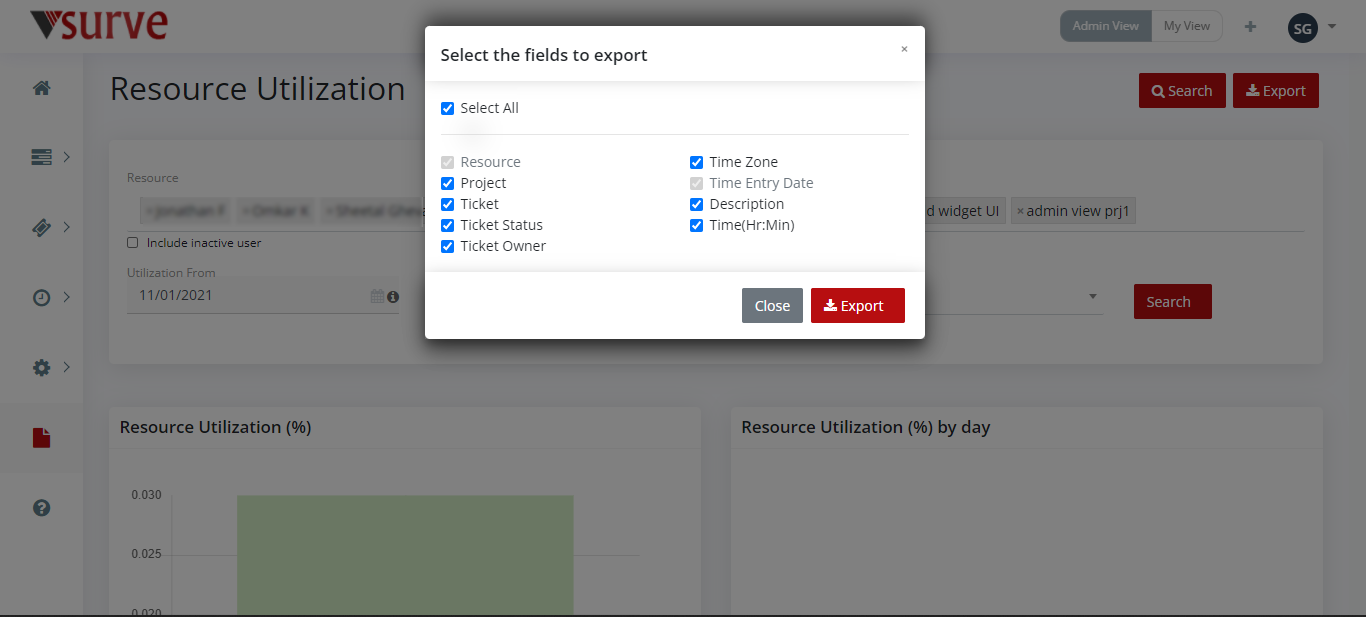
You can export the table data using the export option given at top right corner. Click on export button, select columns you want to be in exported file, then click on export button. File will be downloaded.
Status Report
Status report gives details of tickets and their statuses of various projects. When you select the Status Report, you are asked to Select values for Project, From and To. Ticket Status and Ticket Owner are optional fields.
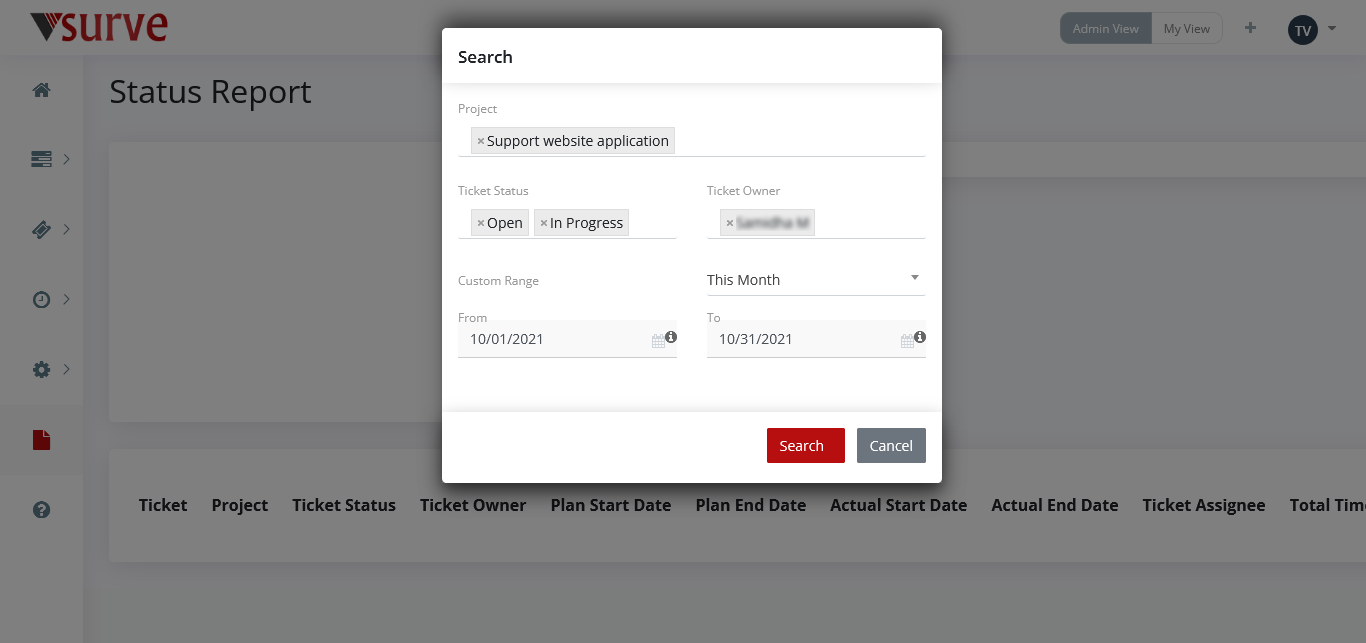
- Toggle search button on the top right side to filter the data further.
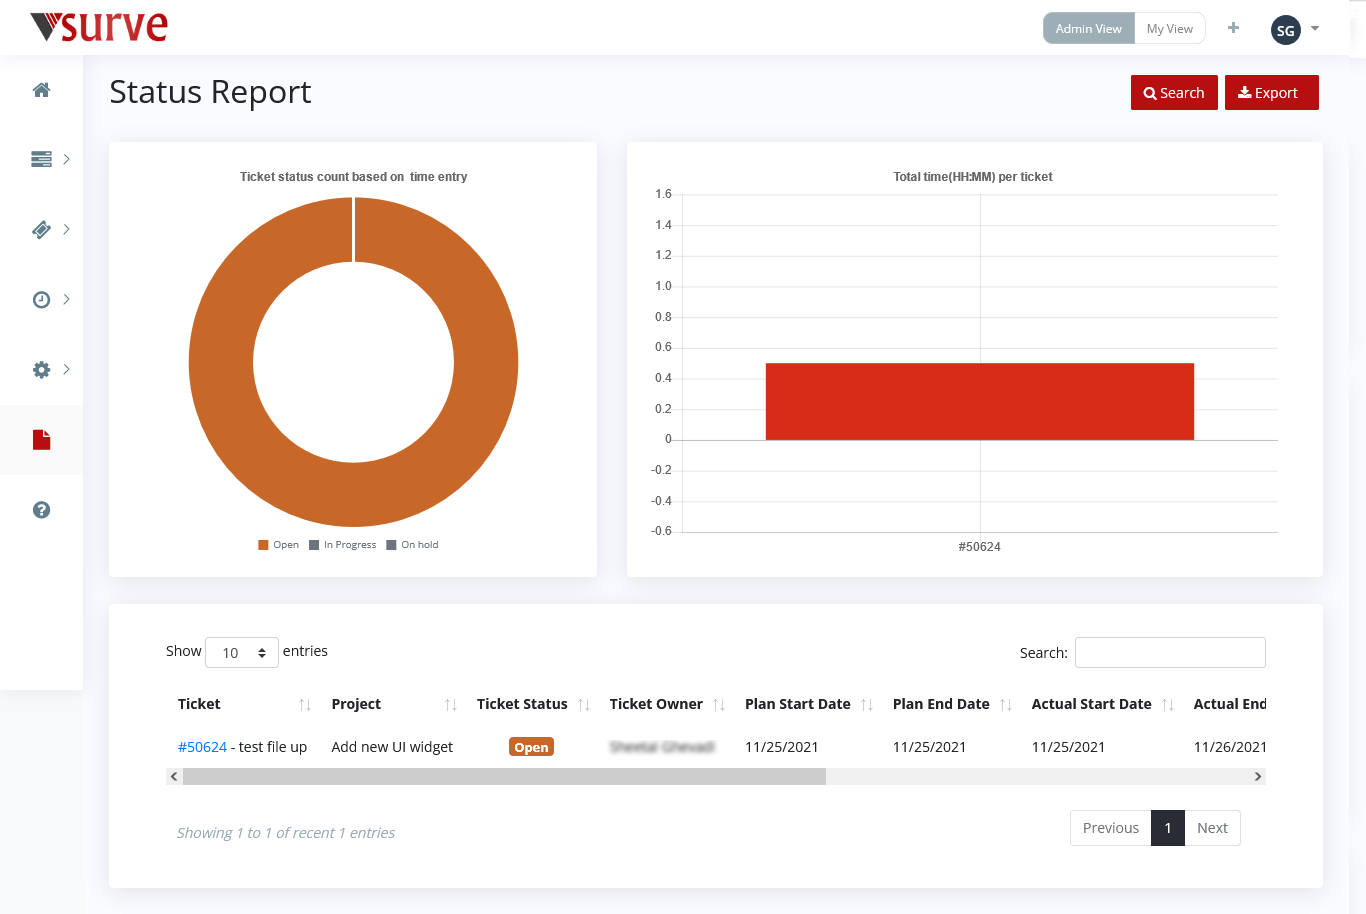
- Donut chart gives ticket counts based on Ticket Status and Bar chart gives total time per ticket.
-
You can filter out the table data based on Ticket Status using donut chart just by clicking on particular Ticket Status.
-
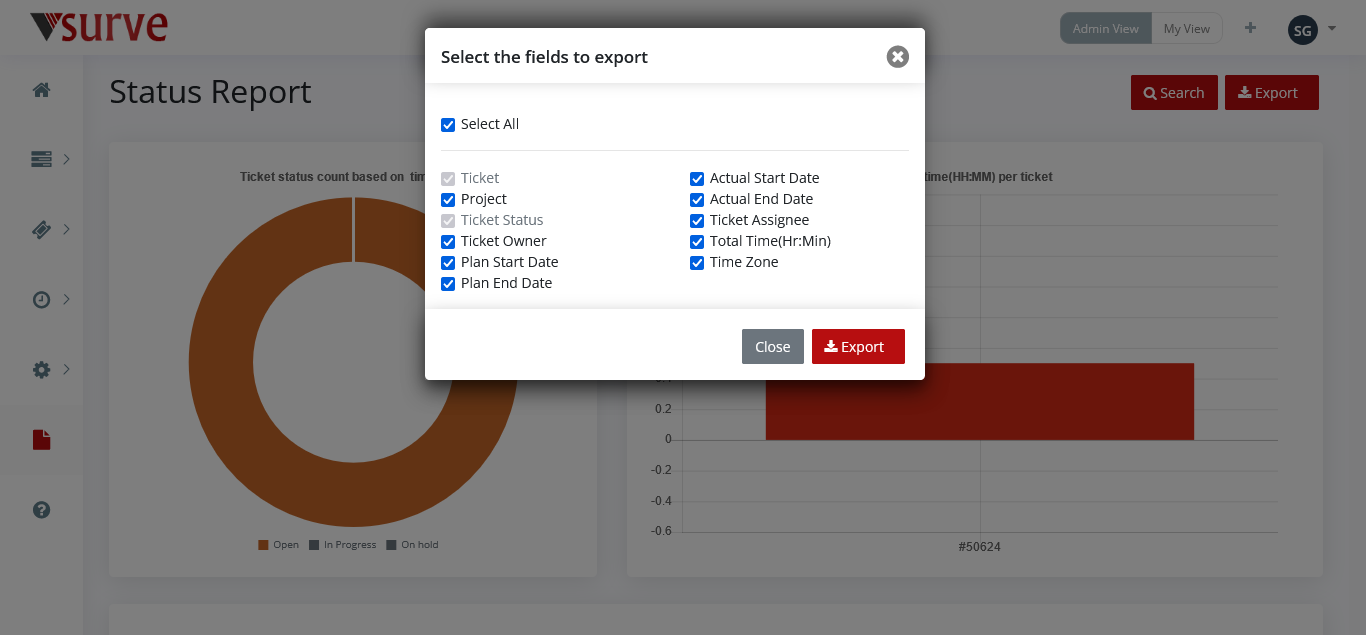
You can export the table data using the export option given at top right corner. Click on export button, select columns you want to be in exported file, then click on export button. File will be downloaded.
Support
There is a support system available to serve you the best. If you have any queries about the application, technical issues, sales questions and if you want to add any extra features then you can go to support system and create incidents. The support team will assist you soon.
Go to the support dashboard from the left main menu by choosing icon.
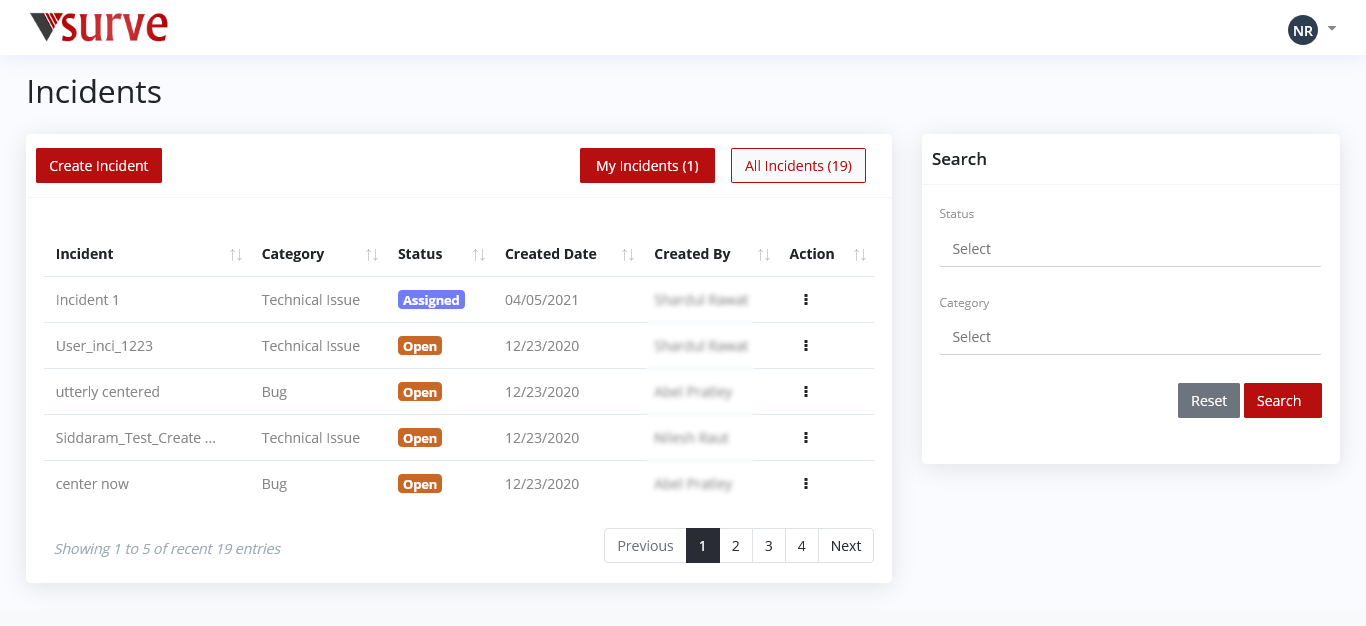
- You can create incident by clicking on “Create Incident” button. Give name, category, description and add related files if any.
- You can filter the incidents based on their status and category using search option given at the right side.
- If you are the administrator, you will have two extra buttons “My Incidents” and “All Incidents” on the dashboard. You can view only your incidents and all incidents from these buttons.
-
You can view the details of incidents using the action icon. When you select “View/Edit”, details of the incident open up. It has 4 tabs details, communication, attachments and contact.
If you are the support administrator then you will have an extra option to assign incidents under the action icon and you can see whom the incident is assigned to in the tab "Assigned To" when you open details of the incident.
- You can edit the description of the incident and add more files using “Send Update” window.
- Also, you have the option to delete the incident under action icon.


